Monday, May 26, 2014

Grout Paint (Part 1)

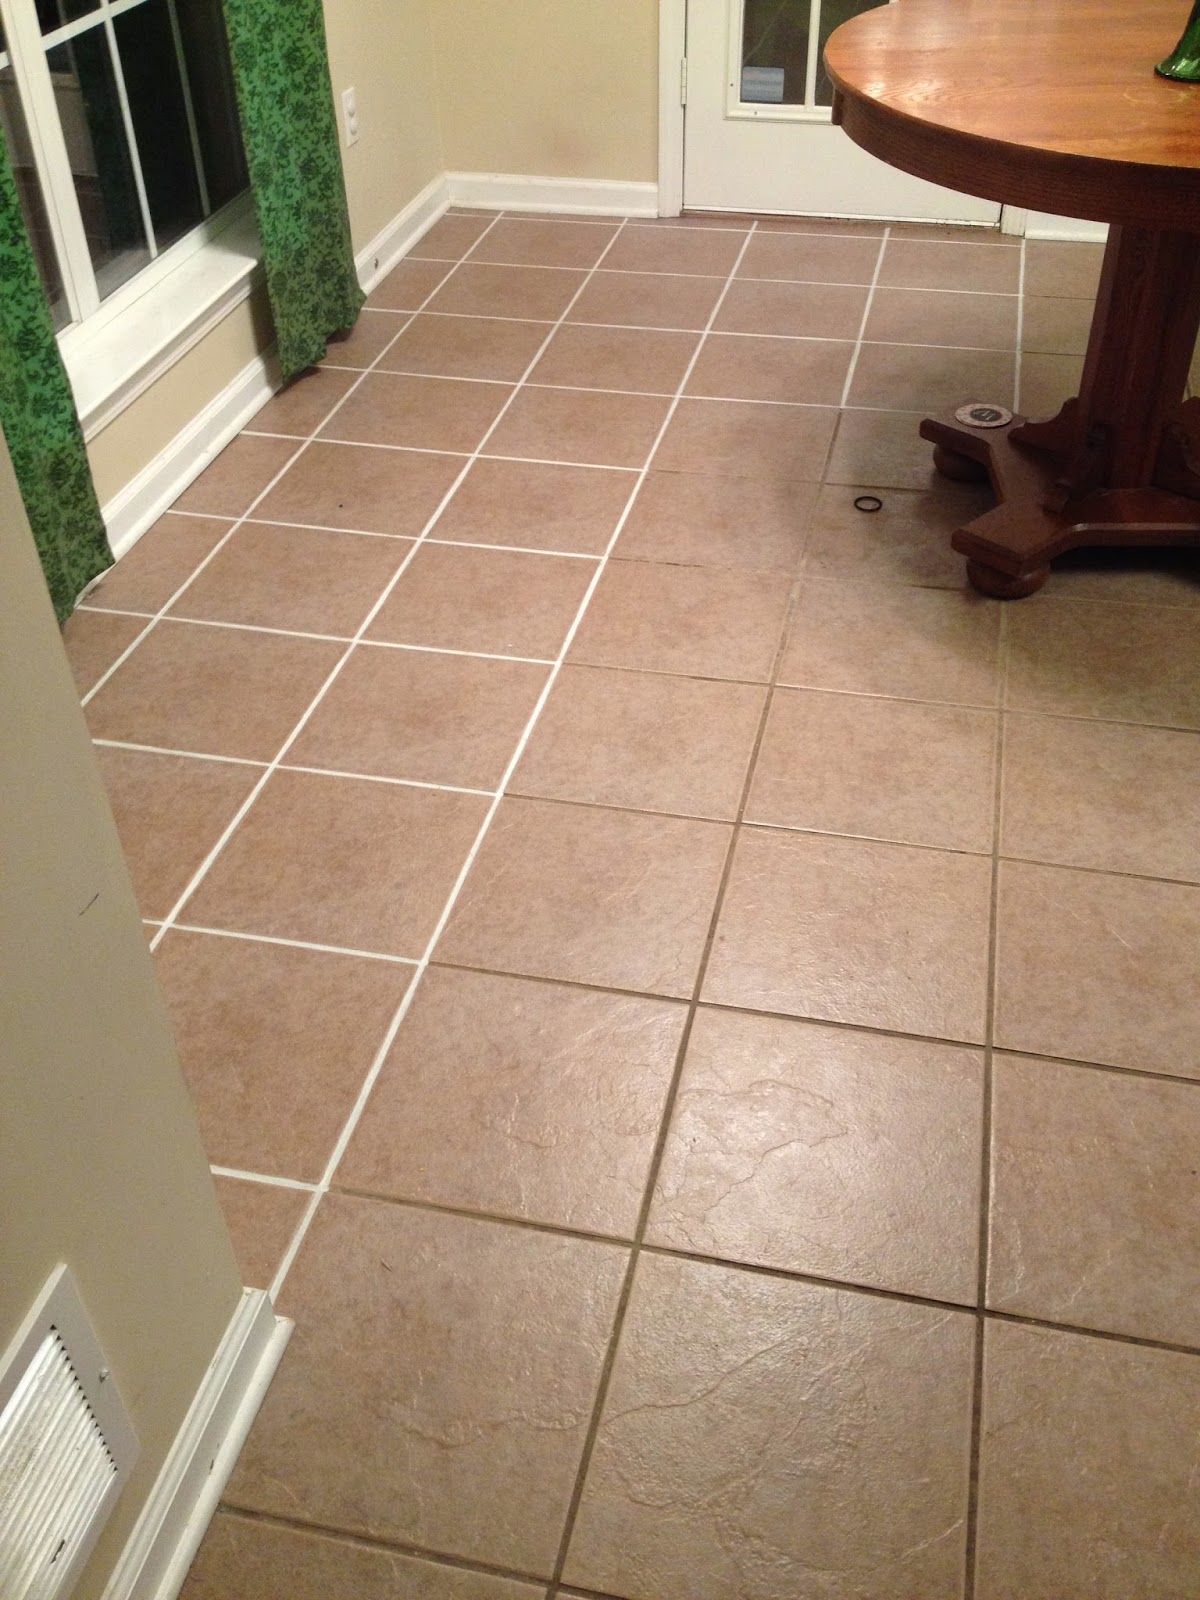
As I've said before (HERE) the grout in our house is NASTY! We looked into re-grouting our tile (because there is so much of in our house) but that would cost a small fortune! I tried cleaning it, that's a joke. I saw on pinterest that Home Depot carried a grout paint. It was only $12, score! I bought some a year-ish ago and did the grout in front of the front door. It was super easy but I'm super lazy and thats as far as I got! I've decided to do the kitchen, hall, half bath and laundry room. Maybe one day I'll do the master bathroom & Reeves' bathroom but for now I'm not going to be too ambitious!!

This is what I used.....


 Before pictures.....
Going into the kitchen from the dining room

Going into the kitchen from the living room


I started one night, and trust me... THIS IS A LLLLOOOONNNNGGGG process! It took me 2 hours just to do the parts in the pictures below....


After I finished those small parts I kept putting off doing the rest of the kitchen...I'm talking 3-4 months. Oops. 

I was tired of hearing Chad ask if I was ever going to finish the grout! Plus, we couldn't have Reeves' birthday party here with half the grout painted!! 

I would like to say... as I write this... THE KITCHEN IS DONE!! WOOHOO! It took about 4 hours but it was totally worth it!!!!

Here are some pictures.... the paint was still drying so the table and chairs were still moved around...


Ready for a tutorial???? 

First I vacuumed the floor. I didn't mop because I didn't want the floor or grout to be wet. I'm going to have to mop in a few days so I didn't want to do it twice. Get my drift?! 

I made a video, I'll try and post it in Part 2! 

For now, bare with my pictures!! :)

I used a small craft brush. The bottle says to use a small toothbrush, I tried that in the foyer in front of the front door and it took forever! I'm use to using the craft brush so it just seemed easier! 

Before.... Isn't the grout nasty??? 

I got quite a bit of paint on the brush and painted in one direction. Try not to go back and forth, you'll see brush strokes. I didn't worry about getting paint on the tile... I'll show you how to clean up later. I figured out I could paint 2 sides of the tile then clean up without the paint drying. The paint dries pretty quick!!


I used an old kitchen towel to clean up the tile! I went through 3 towels! I rinsed out each towel twice before getting a new one. I noticed the paint didn't "wash" out as easy after the second time. 


I just followed, with my finger, the line where the grout and tile met. Sometimes my towel would smudge some of the paint... I would just carefully fix it with my brush. 

Is every line of grout perfect? Absolutely not. There is no way I could get the paint perfect on every line of grout! When you're sitting on the floor staring at it, you can see imperfections! But, I thought about it like this... how often do people stare at your grout??? Even if they come in a know it looks different (um. clean?) they'll be standing. I decided it wasn't worth the trouble to make it perfect! 


I can't get over how amazing it looks...


After I finished the kitchen, I noticed most of the tiles looks like they have a "film" on them. I'm guessing I didn't clean as well as I thought when I was cleaning around the grout! Oops. 

I have to wait 72 hours before I can get the grout wet, so I'll mop then! 


In part 2, I'm going to work on the hall, half bath and laundry room. Since the grout I just painted is bright white, I'm going to redo the front foyer, I'll show you that too. I'm also going to do the clean up. Stay tuned!!!! 


Thursday, May 22, 2014

Photo Wall

When you come out of our laundry room, there is a big blank wall. It drives me crazy! I decided it was a perfect place for a photo wall. I love photos! They make me happy, and this blank wall is right outside of our master so I see them every time I leave our master.

I got Chad to cut some cute designs out of plywood and had some pictures printed. I painted them in different colors.


Here's what it looked like when I finished. 


They have been up for about a year. The colors are driving me CRAZY! It's too much! I want to paint them white.  I wanted to keep the photos so I did some brainstorming.

Here's what I did....

I took all the frames upstairs to the craft room and laid them on the table. I thought about putting blue painter's tape over the pictures but that would have taken forever. 


I decided to take a chance and free hand it! I used the "newest", cleanest brush I had. I used valspar white paint (I figured it was thicker than acrylic paint from walmart). I went very slow and tried my hardest not to get paint on the photo.


First coat covered it pretty well. You could still see lines in the paint so it defiantly needed two coats. 


Clearly I wasn't perfect in drawing the straight line with white paint. But luckily the paint just wiped off!! Used my fingers and wiped it off as soon as I saw it. If I waited, it would dry! 


It's still not perfect, but hanging on the wall, you can barely notice!


My hands look like this every time I paint! ha.


I love the way it turned out. You notice the photo instead of the loud color of the frame!


Before & After (maybe you saw this on instagram)


After!! Reeves was being Vanna! I think I'm going to paint the bench white too. We'll see.


What do you think? Do you like the white better? What color should I paint the bench? 


Tuesday, May 20, 2014

Backyard Bliss

Hey Ya'll!!!!!

   Ok! So.... I am going through this crazy organizing mode at my house right now....

SPRING CLEANING Fever! Sure... That's what we'll call it... LOL!

So, yesterday... I was walking on my deck and thought I need to organize my back porch as well as have somewhere I can put my garden/flowerbed tools.... Out of the corner of my eye I saw a pallet leaned up against our fence. And it dawned on me!!!!
It looks rough right now! 

A Pallet shelf thingy!!!!


It was actually pretty easy to make my pallet shelf thing! He he!

So I sanded down the rough stuff that would poke me!
Then I went to my handy dandy Silhouette Cameo... Cut out a cute phrase I borrowed from a strangers Folder name on pinterest .

I painted the area I would be placing my stencil... Blue!

Let Dry.
Placed the stencil on top...
Painted the whole thing yellow!!! My favoritttteeee Color!
I painted 3 coats, mainly because pallet wood absorbs the paint and color the first coat.


I then peeled the letters off!! eeeekkkk Super easy!


Love it!

Then just hung some hooks I had in a picture hanging set I had and Voila!!!! I seriously love it!!


In between the drying time of the paint on my cute little pallet... I had another idea.
I wanted a table underneath my back porch... I had looked on craigslist, on an estate sales website, then other retail stores and either didn't want to spend the money or couldn't find what I liked.
yuck!!!

We have a lot of spare wood from the deck tear out and rebuild. I started looking through the scraps... Ran across a lizard... Screamed! My husband came out to save the day. He then told me he would “clean up that wood” …. One day! I then explained I was going to make a TABLE! He chuckled and started to walk away.... (which he probably should have ran away) I requested his assistance.... For about the next 3 hours. Ha ha!


He did a lot of the heavy lifting... I measured, marked off, sanded, and etc.
I measured 3 (1X6's) 5ft. In length of the old wood.
My husband is still adding on to the deck so we happen to have some new wood as well... So I measured the same 5ft in length for those as well... My husband cut them.
I ended up using 2 (1X6's) 5ft in length of the old and 3 of the new.
Measured those in width.... 2.5 ft
then I measured four 2X4's.
Two 5ft for the length of the table and two 2.5 ft for the width of the table...
The husband proceeded to cut those....

Pulled them together tight... Again with the husband's assistance. I used an airgun and nailed them together bc... Our screws were either too short or too long (for a stable table you would want to screw them in, which I will be doing tomorrow)

We also had some post sitting around from the deck as well...
My hulk of a husband hoisted up the table while I sat down in a chair I would be setting underneath the table and decided how high we wanted the table, measured it off, cut 4 of those bad boys and slapped them on....

Well....Slapping them on didn't have the best hold. So the husband thought it would be a good idea to put a post in between each of the post on each end and it worked perfectly!!!


Dinner for two? Why Yes please! :)


We had a lot of fun together putting this table together! And I LOVEEEE it!!!
It goes perfectly with my porch!!

Thanks for reading ya'll! I have a couple of more additions to my sweet porch in the next couple of days!!!! 

If you have any questions, please don't hesitate to ask! 
Have a Great Wed!!!!


Monday, May 19, 2014

Fabric Banner Tutorial

Sweet Grass Designs was recently in a craft show. I made a fabric banner for the table.

Here's how I did it...

At walmart I bought a sample pack of fabric, like THIS.

I cut the fabric into strips.... about an inch. I didn't really measure them and they aren't cut straight. I really won't matter when they are all hanging together.


I used a long piece of yard (doubled) as my string. I tied it in a loop on each end so I can hook it on a nail if needed.

Here's how you tie it on the string so they all hang nicely together...

1. Lay the fabric under the string (notice the fabric isn't straight)...


2. Turn the fabric over the string about 2 inches. 


3. Loop the fabric around the string and tie a knot.  This picture is kind of confusing but it's hard to tie a knot and take a picture! ha


4. Pull it tight. You should be left with about 2 inches (give or take) on the top of the string. It shouldn't be so tight that it won't slide on the string. You'll need to move them around.


5. Repeat 1,000,000,000 times. 


I loved the way it turned out. It added just enough to the front of Sweet Grass Designs' table at the craft show!


I made one for our mantel at Christmas. How cute is that???


I'm pretty sure I'm going to make one for Reeves' birthday party! They are so easy and fun! I love them!!!